donderdag 26 april 2012

Happy Go Lucky!

Een leuk, vrolijk, ongecompliceerd bloemetje om te maken. De nederlandse werkbeschrijving vind je hier http://www.ravelry.com/patterns/library/happy-go-lucky-nederlands voor maar €1,50.
Quite a sweet little carefree flower to make. Buy the english pattern here http://www.ravelry.com/patterns/library/happy-go-lucky-english for just €1,50 or USD 1,99.

Veel plezier ermee!
Enjoy it!

dinsdag 24 april 2012

Nieuwe tutorial op Ravelry


Het is me eindelijk gelukt! Vanaf nu zal ik ook af en toe een tutorial aanbied op Ravelry. Voor deze Fleurs d'Avion hoef je alleen maar deze link te volgen. http://www.ravelry.com/patterns/library/fleurs-davion-2
I finally made it! From now on I will also offer a tutorial now and then on Ravelry. Feel like making these Fleurs d'Avion? Just follow this link http://www.ravelry.com/patterns/library/fleurs-davion-2

donderdag 12 april 2012

Crochet Flowerbox tutorial

Wat dacht je van een mooi cadeaudoosje voor een dierbaar persoon?
How about a lovely giftbox for that special person?
Materiaal:

Aïda band
Borduurgaren/ Embroidery yarn

Neem een doosje (wat je maar in huis hebt) met een deksel. Beplak het deksel met wolvilt. Haak een lapje voor de onderkant en voor de bovenkant.Bereken zelf het aantal steken aan de hand van de stekenverhouding van het garen dat je gebruikt. Plak deze gehaakte lapjes op hun plaats.
Take a box or a jar (any jar or box) with a lid. Crochet a piece for the side of the lid and a piece for the jar.Calculate the number of stitches regarding the gauge of your yarn. Paste them in place

Maak 6 rozenblaadjes: 2lossen, 2v in de tweede losse van de nld, keerlosse
(2in1)x2, keerlosse
1v, (2in1)x2, 1v, keerlosse
1v, (2in1), 2v, (2in1), 1v, keerlosse
8v, keerlosse
8v, keerlosse
1v, 1hst, 1st, (2dst in 1)x2, 1st, 1hst, 1v, afhechten
Make 6 rose leafs: 2ch, 2sc in second chain from hook, 1ch
(2in1)x2, 1ch
1sc, (2in1)x2, 1sc, 1ch
1sc, (2in1), 2sc,(2in1), 1sc, 1ch
8sc, 1ch
8sc, 1 ch
1sc, 1hst, 1st, (2dst in 1)x2, 1st, 1hst, 1sc, batch of

Hecht een andere kleur aan bij  het onderste puntje, 1losse, 1v opdezelfde plek. Omhaak het blaadje met vasten. in ieder hoekje maak je drie vasten op dezelfde plek. Soms moet je in een steek 2vasten in 1 haken. Dit merk je vanzelf tijdens het haken.
Attach a new color, 1ch, 1sc on the same place. Make sc around the leaf. At some points you have to make 2sc in 1. You know when as you go. In every corner make 3sc.


Zo ziet het blaadje eruit als het klaar is.
This is what the leaf looks like when finished


Vouw het blaadje dubbel op deze manier...
Fold the leaf like this...

..En rijg de 6 blaadjes aan een draad.
..And attach all 6 leafs to the yarn like this.

Bind ze samen op deze manier en plak op het deksel. Plak een wolkraal in het midden van de bloem
Tie them together like this and paste into place. Paste a feltbead in the middle of the flower.

Maak 2 blaadjes: 15losse, 1 keerlosse
1v, 2hst, 9st, 2hst, 1v
2v op dezelfde plaats als de vorige v (= hoekje om)
2hst, 9st, 2hst, 1v, 1hv
Make 2 leafs: 16 ch
1sc, 2hst, 9st, 2 hst, 1sc
2sc on the same spot as the last sc (=transfer to the other side of the work)
2hst, 9st, 2hst, 1sc ,1slipstitch

Borduur op Aïda band een tekst naar keuze. Kijk op http://www.stitchpoint.com/ voor een leuke tool. Plak dit band op het doosje
Embroider a text of your choice on Aïda band. Check http://www.stitchpoint.com/ for a great tool. Paste into place.

maandag 2 april 2012

Crochet Flower Tutorial

Zin om dit bosje bloemen te haken? Dan laat ik je hier zien hoe ik het heb gedaan.
Feel like crocheting this little bouquet? I'll show you how it's done.

Materiaal
Aluminium draad

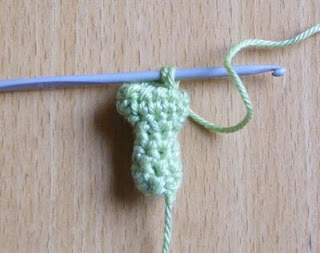
Maak een magische ring met 6v. Haak 3 toeren 6v. Haak dan een toer 2in1, je hebt 12 steken. Vervolgens nog 1 toer 12v.
Make a magic ring with 6 sc. Three rows 6 sc. One row 2in1, now there are 12 stitches. One row 12 sc.


Hecht een nieuwe kleur aan. Haak steeds 10 lossen, maak een hv in de volgende steek. Je krijgt zo 11 blaadjes.
Cast on a new colour and make 10 chains. Make a slip stitch in the next stitch. Repeat throughout the row. You'll have 11 leafs.

Maak nu steeds 15 lossen en werk achter de blaadjes van de vorige toer. Maak elke lossen ketting vast met een hv achter het vorige blaadje langs in dezelfde steek waar de hv van het kleine blaadje ook in zit.
Make 15 chains en work behind the leafs of the last row. Attach every chain with a slip stitch behind the leaf of the last row in the same stitch of the slip stitch of the small leaf.

Ik hoop dat deze foto iets duidelijker laat zien waar de halve vaste van de grotere blaadjes moet komen.
I hope this pictures shows more clearly where the slip stitch of the bigger leafs should be

Zo ziet je bloemetje eruit als het klaar is. Plak er een wolkraal in.
This is what your flower looks like when ready. Paste a felt bead in it.

Neem nu een stukje aluminium draad en haak eromheen.
Now take a piece of aluminium wire and crochet around it.

Zo ziet het eruit als het klaar is. Laat een lang draadeinde over.
This is what it looks like finished. Leave a long yarn end.


Naai de bloem aan de stengel.
Attach the flower

Wikkel het garen eromheen en hect af.
Wrap the yarn around it and batch of.
 Geniet van je zelfgehaakte bosje bloemen! Omdat het aluminium draad heel buigzaam is kun je de bloemen natuurlijk ook ergens omheen wikkelen.
Enjoy your handmade bouquet! The aluminium wire is very flexibel so you can also wrap the flowers around something to decorate.